Eating out has been more expensive than ever, especially sushi. But, making sushi at home sounds intimidating, expensive, and dealing with raw fish seems a bit risky. However, with the right preparation, and a full single whole salmon from Costco, you can make hand rolls, nigiri, and sashimi for a fraction of restaurant prices.
This is exactly how I turned a $22 salmon from Costco into what would easily cost $100 of sushi from a restaurant, and honestly, it was one of the most satisfying cooking projects I’ve done.
What You’ll Need
Ingredients
- 1 whole salmon, skin removed
- Kosher salt
- Sugar
- Sushi rice (cooked and seasoned)
- Nori (seaweed sheets)
For salmon hand rolls
- Soy sauce
- Sesame oil
- Kewpie mayo
For spicy salmon
- Sriracha
- Mayo
Optional glaze
- Soy sauce
- Sesame oil
Important Note about Sushi-Grade Salmon
“Sushi-grade” is not an official FDA designation, it’s just a market term that describes fish that’s been handled and processed in a way that’s safe to eat raw. In practice, this means that salmon has been properly frozen to eliminate parasites, handled carefully, and sold for raw consumption.
I recommend getting a farm-raised salmon, specifically from Costco since Costco does follow strict food safety and handling standards. Additionally, farm-raised salmon has a lower risk of parasites compared to wild salmon.
Step 1: Slice the Salmon
Start with your entire salmon, already skinless. Costco has versions where the salmon skin has been separated from the salmon meat. Slice the salmon into filets about four fingers wide. From one whole fish, I got roughly six portions.
Now, I’m using only four portion for sushi, and this will be enough to make several handrolls, sashimi, and nigiri pieces.
Step 2: Cure the Salmon
Quickly curing the salmon makes it firmer and makes it taste cleaner.
- Lay the salmon on a tray. I prefer having a cooling rack as the cure pulls liquid, and you don’t want that liquid to pool under the salmon.
- Rub generously with equal parts salt and sugar.
- Rest for 30 minutes in the fridge.
After 30 minutes, rinse off the salt and sugar cure and pat the salmon completely dry. You will notice it looks glossier, shinier, and feels firmer.
Step 3: Separate the Loin and Belly
Each filet has two distinct sections:
- Loin (leaner, firmer)
- Belly (fattier, richer)
Slice the filet lengthwise at the halfway point to separate them.
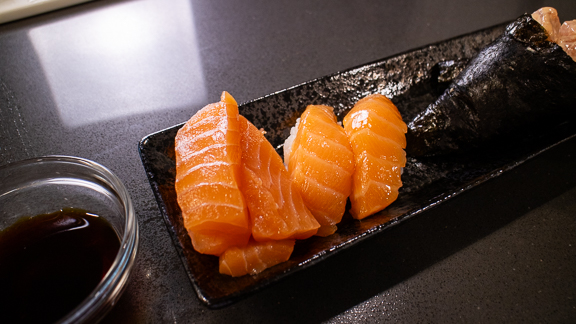
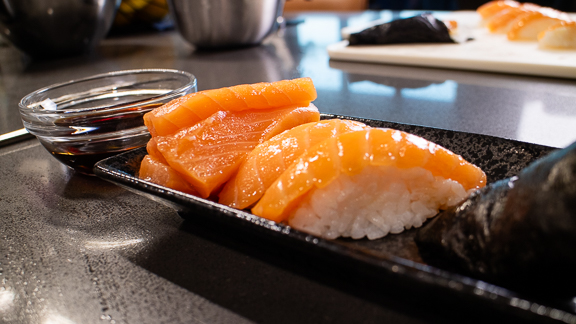
- Loin: rolls + sashimi
- Belly: nigiri
Any smaller or uneven pieces get chopped up for hand rolls.
Step 4: Prep the Salmon Cuts
For Rolls & Sashimi
Slice the loin into clean strips for:
- Sushi rolls
- Raw sashimi
For Nigiri
Slice the belly into wider pieces that can drape nicely over rice.
For Hand Rolls
Chop the smaller salmon pieces into bite-sized chunks.
Step 5: Season the Hand Roll Fillings
Savory Salmon Hand Roll
Mix together:
- Chopped salmon
- Soy sauce
- Sesame oil
- Kewpie mayo
Rich, savory, and super balanced.
Spicy Salmon
Mix:
- Chopped salmon
- Sriracha
- Mayo
Simple, classic, and always hits.
Step 6: Build the Hand Rolls
Set up your sushi station with:
- Nori
- Sushi rice
- Salmon mixtures
To assemble:
- Place rice on the nori in a cone shape
- Add salmon filling
- Roll across and seal into a cone
Repeat until you’re satisfied (or until you run out of salmon).
Step 7: Make the Nigiri
Nigiri is all about hand technique.
- Take a small ball of sushi rice
- Shape it into a rectangle using the “L method”
- Curl your fingers forward to form one side
- Use your thumb as the other side of the L
- Place a slice of salmon on top
- Gently press to secure
Repeat as many times as your salmon allows.
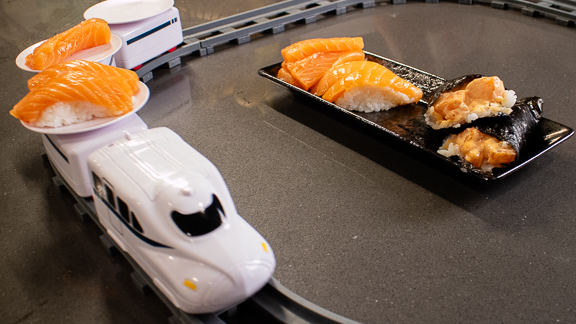
I had a sushi train set that I purchased for myself the Christmas following my trip from Japan. I missed the bullet train sushi experience, so I purchased one to properly plate. On these tiny plates, I had salmon hand rolls, nigiri, and sashimi.
Was It Worth It?
Absolutely. One $22 salmon turned into:
- Multiple hand rolls
- Nigiri
- Sashimi
- Plus extra portions frozen for later